DIY: Costume Jewelry Tree
If I had a Christmas tree, I would light it with vintage bubble lights, just like the ones we had as kids, when my siblings and I would race them to see whose light would start bubbling first. Then, I would hang ornaments from the box my mother started when I was born—the one she added to each year so when I moved out, I would already have meaningful ornaments for my tree.
Isn’t that precious?
But I don’t have a Christmas tree, because I have pets that can't be trusted. A giant dog who doesn't know his own size, and a cat whose personal mission in life to destroy everything I love. (That's right, Seamus. I'm onto you.)
So instead I’ve put together a festive holiday topiary that acts as an homage to the vintage baubles I long for from Christmases past. And there’s no tedious clean-up afterwards. And my pets can’t reach it. And it’s all possible thanks to—you guessed it—estate sales.
This year, I’m classing up my home and the holidays with a costume jewelry tree. This wall art had a heyday in the 1970s, and is a great way to repurpose outdated and broken jewelry. The wonderful thing about these trees is that they can be as sparse or ornate as you’d like, depending on your mood, decor, and cache of old jewelry. You can give your tree a theme: A specific color. A certain shape. Jewelry from a specific time period. A tree made entirely of cat brooches! Oh, the possibilities are endless!
I picked up a lot or two of jewelry over the last year, knowing I wanted to make this tree. And now that I’ve just come up with that awesome cat-brooch idea, my estate sale hunting for the upcoming year just got really specific.
I can’t wait.
To make your own costume jewelry tree, you’ll need to gather your supplies.
- Foam board.
- Utility knife.
- Fabric, to cover your foam board. We chose black velvet because we’re very classy.
- Adhesive fabric spray.
- Strong glue. (We used E6000.)
- Stick pins. I used pearl-ended pins so I could leave them in place permanently without compromising the final product if they showed through.
- A whole mess o’ jewelry.
- A frame or shadowbox. In our case, we used a frame that once held a large copy of The Last Supper, which was poorly hung in my dining room. When it fell, the picture broke, but the frame remained, just waiting for its time to shine again. Now is that time.
The process is simple. First, cut your foam board to fit your frame. We used a utility knife and a ruler, and it was cut in short order. Then, we sprayed it with adhesive, and laid the fabric down smoothly. We cut the fabric to be just about an inch larger than the foam board.
Once I was confident the fabric was stable, I flipped the board over, so I could glue the edges of the fabric to the back. You can use whatever adhesive you’d like to make this happen—it won’t be visible once the final product is mounted on the wall.
With the foam board ready, now it’s time for the fun part: designing your tree. This will likely be time-consuming. You’ll want to have the whole design planned before you start permanently affixing things. So take your time, lay out all your jewelry, then ask yourself the important questions: Do you want a basic triangular tree, or something more intricate? Individual branches? Are the earrings best placed paired together, or far apart? Do you want a symmetrical layout or something with a more random feel? Do penguins have knees? Are you willing to cut apart that string of faux pearls, rendering it unwearable, in order to give your tree a pretty pink garland?
Once your questions have been answered, and you know how you want your tree to look, piece-by-piece, move your tree to the side, so you can assemble it for real.

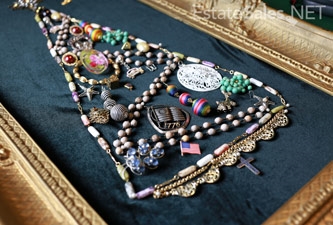
I went with a simple triangle. I liked the idea of letting a long string of beads act as my outline, and it just happened to be the perfect size. I pinned the three corners of the tree in place, then lightly glued the sides. Now I had my boundaries.
I chose to mostly use earrings and pins. I had a surplus of necklaces, but they didn’t fit into the tree the way I wanted them to, and frankly, it was simply easier to use jewelry with built-in pins. I could use less glue that way, and permanently harm fewer pieces. I have no intention of wearing these pieces again, and therefore could have broken or cut the strands in any way I saw fit, but it was the principle of the thing.
You, however, can do what you wish. We all live by our own codes.

So, start pinning and gluing away! Consider your layers and the movement of your jewelry. Pearl-strands and other necklaces will likely do better if they’re glued down first. If they can’t move around, they can help you to work the rest of your jewelry into a specific space. And then you can allow dangly earrings or swingy baubles to hang over the glued-down string-beads.
Keep your original design in mind, and all your pieces within reach and sight, so you can keep them in mind as you space out your jewelry. And so you don’t end up like me, and leave your very favorite piece out of the tree altogether.
Look at this guy. I bought him specifically for this project. By the time I realized I had forgotten him, it was too late. The glue was dried, and his fate was sealed. And now he sits on my desk, staring at me, reminding me of that fateful day and what could have been. You know, really laying it on thick. He’s not my favorite anymore—turns out he’s kind of a jerk.
Once your jewelry is glued, pinned, or otherwise stuck into place, you should allow it to dry, and then frame it so you can begin enjoying the fruits of your labor. If you made your tree on a horizontal surface (rather than, say, an easel), lifting the board into a vertical position will be terrifying. What if everything falls off?!
It won’t. I believe in you, and in the magic of Christmas.
It's easy. See?