DIY teacup candles
I am not crafty.
Unlike my coworkers, who make tables out of barn doors or reupholster chairs on a whim, projects I take on usually end in a pile of failure.
I wander through estate sales and think “Yes! I can distress this bookshelf!” But I am the only one who ends up distressed. “Oh, a beautiful but non-functioning typewriter! I used a typewriter once. Surely I can repair this and bring it back to its former glory!” I exclaim. “I will cart it to the coffee shop and compose haikus about the people who pass by!”
But it never happens. The untouched materials, or mangled remains of a failed project, end up in my basement, the latest addition to my dusty pile of good intentions and broken dreams. (“Ol’ Dusty,” I call it.)
But finally, I have found a project so simple even I can do it. But one with limitless possibilities for creativity. Last week, I wandered through an estate sale at the home of a woman who moved to a retirement community. The house was filled with what you might expect: well-worn Corningware; a garage full of Christmas decorations; an electric piano; and, of course, a tea set.
What estate sale would be complete without one, displayed on a freshly-dusted cabinet, though likely unused for years?
I didn’t want to leave without those cups and saucers. I knew I would never use them for their intended purpose, but they were affordable, as estate sale china tends to be. So I bought them, knowing there was a 90 percent chance they would ultimately become the property of Ol’ Dusty.
I also have amassed a collection of candles of various sizes and colors. I wanted something to become of them as well. With a house filled with pets and family, I rarely have occasion to bust out the candelabra. But, because of the aforementioned pets, it’s nice to light a small scented candle on occasion.
I think you see where I’m going here. As if the title of this post didn’t give it away.
Going to the craft store, buying fresh blocks of beeswax or soy flakes, wax dye, and wicks to make candles is easy and fun. Repurposing old candles is even moreso: you save a fortune on materials, and there’s no question of what color your candles will ultimately be, unless you get adventurous and blend shades.
Which you should, because life is short. But let’s start with the basics.
What you need:
A double-boiler, or a large pot and a heat-safe jar or a pot small enough to fit inside. (I use a large glass measuring cup here, but when I was in a pinch at home, a Mason jar worked just fine.)
Candles, any shape or size.
Liquid candle scent, if desired.
Wooden dowels
Teacups of your choice. Or coffee cups. There’s no reason to discriminate. Just make sure they are in good condition. They don’t have to be perfect, as far as paint is concerned, but avoid using cups with foundational cracks. I don’t know how a such a cup would react to the heat of a candle, and I don’t want to find out.

You may also need to purchase candle wicks, depending on the quality, quantity, and size of the candles you’re repurposing. A tall, half-used pillar candle may have plenty of wick left for a dainty teacup candle. Tealight nubbins will not. Plan accordingly.
Gather your candles and chop them up with a knife. This isn’t necessary if they can fit into your double boiler as is, but it will speed up the melting process considerably. It will also allow you to extract the wicks from your candle. Or you can fish them out from the melted wax, if that’s easier for you, but I wouldn’t recommend it.
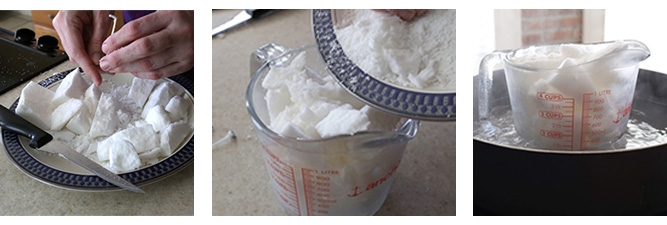
Fill your pot with 2 to 3 inches of water, and bring it to a boil. Place your smaller pot directly into the larger one. Melt the wax over the boiling water, stirring occasionally.
This will take a while. Don’t get discouraged. The work is worth it.
If you’re going to add color, you can drop in a color square or liquid dye toward the end of the melting process. Once liquified, take the container of wax out of the boiling water and allow it to sit for 5 to 10 minutes.
The glass container will be incredibly hot, so there’s no danger of the wax hardening right away. (But there is danger of burning your fingers, so use an oven mitt!) If you’re adding scent, wait until it’s cooled a bit before doing so, otherwise it will dissipate immediately. Ideally, the wax will be less than 180 degrees when you scent it, if you want to get technical.
As it cools, dip the bottom of your wick in the hot wax, and set it in the middle of the teacup you’re planning to use. This will help “glue” the wick to the center of the candle. If the wick decides to move after you fill the cup, you can use wooden dowels—or pencils or clothespins—to hold it in place.
You can use a similar gluing tactic with the cup and saucer. Add a small amount of wax to the the center of each plate. Place the cup in the middle and press firmly to affix the cup firmly but non-permanently to the saucer.
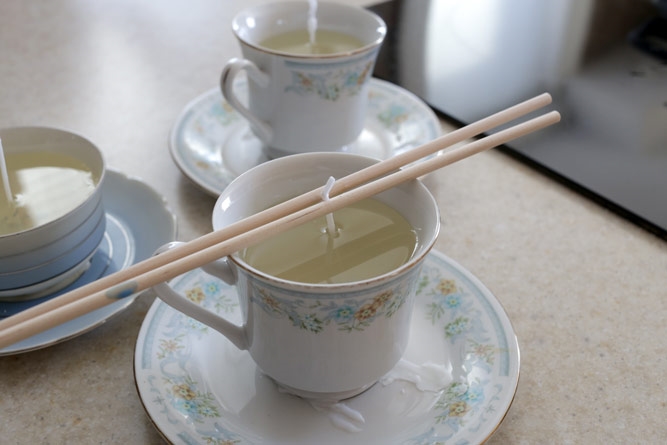
Once the wax has cooled slightly, and the scent has been added, fill the teacup about ¾ with hot wax. Allow to cool until solid. For the teacups pictured, it took about four hours.
It’s possible the top of your candle will dip in the center or go a little wonky after it’s cooled, depending on the type of wax you’re using. If that happens, you can pour another small layer of wax over the top.
It’s an easy project completed in just an hour or two, which is perfect for those of us whose crafty ambitions are thwarted by impatience. And while younger children should probably not get involved with hot wax, my eight-year-old was happy to help stir the wax as it melted, select colors, add the scent, and monitor melting progress. And, because candles make every day a celebration, she’s happy to blow them out whenever we leave the room, since you should never leave candles unattended.
I look forward to hunting down more teacups, and deciding the perfect color and scent combinations based on the pattern and my many moods.

And there you have it. A pretty teacup light to bring new life to an estate sale find, or perhaps an heirloom set of china you never thought you’d use.